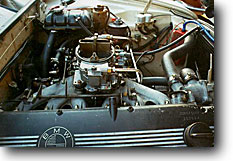
Disconnecting the carb |
| 1 |
|
Disconnect the battery negative terminal. No
reason to have any chance to short something out. |
| 2 |
|
Remove the air filter housing cover. If you've
never done this before, you should probably stop here and not
attempt a carb rebuild :^) |
| 3 |
|
Remove the two nuts on top of the carbs which
hold the air filter housing in place. Remove the air filter
housing (being careful to keep the any attached hoses nearby).
|
| 4 |
|
Disconnect the fuel inlet hose at the carb inlet
block (loosen hose clamp, remove and plug hose). Label it. |
| 5 |
|
Disconnect the evaporative line from the bottom
of the carb inlet block (loosen hose clamp, remove and plug
hose). Label it. |
| 6 |
|
Disconnect the vacuum line to the rear intake
manifold (on the drivers' side). Label it, note that it is connected
to a "T" with the vacuum line to the base of the front carb
and to the canister that lives below the battery. |
| 7 |
|
Disconnect the vacuum line to the base of the
carb on the drivers' side. Label it, note that it is connected
to a "T" with the dashpot mounted on the firewall on the drivers'
side (white vacuum line) and the middle of the 3 dashpots on
the passengers' side of the firewall. |
| 8 |
|
Disconnect the wire to the automatic choke. Label
it. |
| 9 |
|
Disconnect the wire to the shutoff valve connector.
Label it. |
| 10 |
|
Disconnect the carb linkage at the ball-and-socket
joint. |
| 11 |
|
Disconnect the vacuum line which leaves the carb
base parallel to the #4 cylinder intake manifold pipe. Label
it. |
| 12 |
|
Disconnect automatic choke water lines. Lable
and plug. Note that the "inner" (closer to the head) line goes
to the forward carb, while the "outer" (further from head) goes
to the block. |
Stuff to make it easier to unbolt the carb |
| 13 |
|
Disconnect the wires to the back-of-the-head
sensor. One for the center of the sensor, one for the side of
the sensor. Label them. |
| 14 |
|
Disconnect the ground wire from this wiring harness
to the firewall in the center of the car. |
| 15 |
|
Disconnect the wire to the front carb automatic
choke. |
| 16 |
|
Disconnect the wire to the front carb connector
to the shutoff valve |
| 17 |
|
Move the wiring harness (to which all the wires
above belong) out of your way. |
| 18 |
|
Remove the dashpot on the drivers side firewall.
Two screws hold it to the firewall. It's got a few vacuum lines
going to the set of 3 dashpots on the passenger side. Just lay
it near those (after labeling anything you had to disconnect)
|
| 19 |
|
Remove the radiator overflow tank. First, disconnect
the large hose to it (from the block?). Then, unbolt the 10mm
bolts that hold it to the firewall and the inside wheel well
(near the master cylinder). |
|
Removing the carb
|
| 20 |
|
Loosen and remove the four nuts attached to
the carb studs that stick out through the bottom of the manifold.
This is a job for finesse, small hands, 1/4" drive ratchets,
and anything else you can think of.
|
| 21 |
|
Do a visual inspection to make sure there is
nothing attached to your carb. |
| 22 |
|
Lift the carb off the manifold; go slow, don't
drop it or break anything now. |
| 23 |
|
Put the carb somewhere and cover the manifold
so tiny stuff doesn't fall in. |
| 24 |
|
Remove the linkage from the choke. |
What now? |
|
You are done. Take a break.
On to the carb disassembly page. |
|