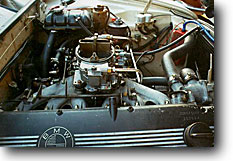
Reattaching the carb body to the manifold |
| 1 |
|
Make sure you have a gasket
installed between the manifold and the base of the carb. |
| 2 |
|
Get your newly rebuilt carb and set it down on
the manifold studs through the bottom. |
| 3 |
|
Get the four lockwashers and nuts for the studs
and all the small 13mm tools you have. |
| 4 |
|
Install the four lockwashers and nuts. Curse
vociferously. This is one of those steps that will take a while.
The nuts are all blind, and most of them are really hard to
reach. |
Reinstalling all the stuff that attaches
to the carb |
| 5 |
|
Unplug and connect the automatic choke water
lines. Note that the "inner" (closer to the head) line goes
to the forward carb, while the "outer" (further from head) goes
to the block. |
| 6 |
|
Connect the vacuum line which leaves the carb
base parallel to the #4 cylinder intake manifold pipe. |
| 7 |
|
Connect the carb linkage at the ball-and-socket
joint. |
| 8 |
|
Connect the wire to the automatic choke. |
| 9 |
|
Connect the vacuum line to the base of the carb
on the drivers' side. It is connected to a "T" with the dashpot
mounted on the firewall on the drivers' side (white vacuum line)
and the middle of the 3 dashpots on the passengers' side of
the firewall. |
| 10 |
|
Connect the vacuum line to the rear intake manifold
(on the drivers' side). It is connected to a "T" with the vacuum
line to the base of the front carb and to the canister that
lives below the battery. |
| 11 |
|
Connect the evaporative line to the bottom of
the carb inlet block. |
| 12 |
|
Connect the fuel inlet hose to the side of the
carb inlet block. |
| 13 |
|
NOTE: Before you continue, take a good last look
at all your hoses and wiring. Once you install the air filter
housing, you won't be able to see most of this. |
Reinstalling the stuff you disconnected
to give you access to the carb |
| 14 |
|
Install the radiator overflow tank. |
| 15 |
|
Reattach the large hose to it from the block. |
| 16 |
|
Install the dashpot on the drivers side firewall.
Two screws hold it to the firewall. It's got a few vacuum lines
going to the set of 3 dashpots on the passenger side firewall. |
| 17 |
|
Connect the wire to the front carb connector
which goes to the shutoff valve |
| 18 |
|
Connect the wire to the front carb automatic
choke. |
| 19 |
|
Connect the ground wire from this wiring harness
to the firewall in the center of the car. |
| 20 |
|
Connect the wires to the back-of-the-head sensor
according to the labels. One attaches to the center of the sensor,
the other attaches to the side of the sensor. |
Reattaching the air filter housing,
other last steps |
| 21 |
|
Install the air filter housing and attach the
PCV and inlet air hoses. |
| 22 |
|
Install the two nuts on top of the carbs which
hold the air filter housing in place. |
| 23 |
|
Install the air filter housing cover. |
| 24 |
|
Reattach the negative battery terminal. |
You are done installing the carb! |
Done with the install? Go to the begining
and read it all again! |